
Qubes OS is a hypervisor based operating system. Qubes OS can host various operating systems such as Linux, Unix or Windows and run them in parallel. Qubes OS can therefore be used to host your own “hacking” laboratory. (source)
Introduction
Due to its virtualization-based architecture, Qubes OS seemed to be the perfect OS in order to set up a pentesting lab that is a) easy to use and b) is separated from your daily-use VMs in a secure way. At the time of updating this article in 2022, information on how to install them on Quebes for the following 4 distributions exist: BlackArch, Kali, PenTester Framework, Parrot. Additionally, with Qubes OS you can easily import VMs from vulnhub.com or any other sources for testing purposes.
Within this article, we will discuss a step-by-step guidance on how to set this environment up. Preliminary conditions: Running Qubes OS (tested with Qubes OS 3.2), Internet connection, enough space on disk.
Architecture Setup
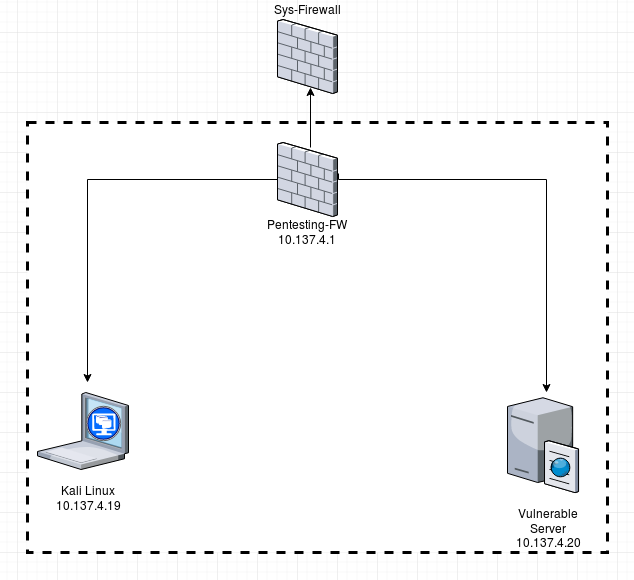
We will set up a virtualized pentesting lab within an existing Qubes OS environment which will consist of a Kali Linux machine, a vulnerable server (pick one!) and a firewall used to separate the 2 machines from the rest of your Qubes installation and to enable networking between both VMs.
1. Installing Kali Linux
You can basically follow the steps on Qubes-os.org for installing a Kali VM in your environment. Within an existing VM (e.g. Disp1), download the Kali ISO:
wget http://cdimage.kali.org/kali-2022.3/kali-linux-2022.3-live-amd64.iso
Let’s assume the VM name you used for downloading the ISO is called “disp1” and the internal file path to the ISO is:
/home/user/download/kali-linux-2022.3-live-amd64.iso
Within Dom0, create the VM via:
qvm-create --class StandaloneVM --label purple --property virt_mode=hvm kali-test
and then load the ISO from the VM and start the installation:
qvm-start kali-test --cdrom=disp1:/home/user/Downloads/kali-linux-2022.3-live-amd64.iso
Important: You need to set the kernel of the VM to none in case you receive a Kernel panic. In case you did everything right, a picture like the one below should come up.
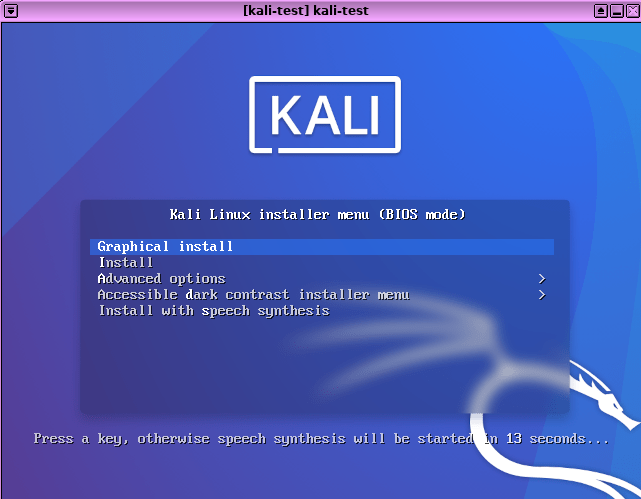
Since DHCP will fail, the networking setup requires you to manually set an IP address which I set to the one used in the screenshot (10.137.4.19).
2. Installing Pentesting Firewall
In Qubes, the sys-firewall VM is a core part of your compartmentalization concept and should be treated as a very sensitive machine. Therefore, you want to create an additional firewall VM which is only managing the compartmentalization within your pentesting lab. We call this firewall Pentesting-FW.
Within Dom0, create the VM:
qvm-create --proxy --label=purple --template fedora-25-minimal Pentesting-FW
Your sys-firewall is normally connected to your sys-net VM - you don’t want to do this for your Pentesting-FW since you should not fully trust it. Therefore, we will connect the Pentesting-FW to your sys-firewall instead:
qvm-prefs -s Pentesting-FW netvm sys-firewall
Within your sys-firewall, you can now treat the Pentesting-FW as an ordinary client, fully separated (network level) and disconnected from the rest of your normal environment. An additional advantage of this setup is that you can now easily torify / VPN your complete VM-based network traffic with a few clicks by simply connecting your Pentesting-FW machine to the right networking component within your VM landscape (sys-whonix etc.)
Before we move on to the third step, make sure you connect your Kali VM to your Pentesting-FW via Dom0:
qvm-prefs -s kali-test netvm Pentesting-FW
Also verify within the existing Kali instance from step 1 that you have a working network connection to your Pentesting-FW instance - e.g. ping 10.137.4.1
3. Installing a Vulnerable Server VM
On vulnhub.com you can find plenty of free, vulnerable server VMs available for download. Alternatively, you can install metasploitable which is available for download here.
As an example, we pick the XVWA (Extreme Vulnerable Web Application) VM and download it. The benefit in this case is that the VM is already in an iso format - so no need in this case to convert the image file.
In case the VM you download only exists in .ova or .vmdk format, you need to convert it via:
qemu-img convert file.vmdk -O raw image.img
As a next step, we create the VM via Dom0:
qvm-create --label=purple --standalone vuln-server and connect it to our Pentesting-FW:
and then load the ISO from the VM and start the installation (where Disp1 is the VM we used to download the iso to):
qvm-start vuln-server --cdrom=Disp1:/home/user/Downloads/xvwa.iso
Now run the installer which is based on Ubuntu 14. It will automatically search via DHCP for a network configuration which will normally fail. Within the VM, configure the network appropriately and verify via ping that the connection to the Pentesting-FW actually works.
4. Connecting the VMs
Now, you have both VMs set up, configured and connected to your Pentesting-FW VM. The Kali instance runs on IP 10.137.4.19 whereas the vuln-server VM runs on 10.137.4.20. Pentesting-FW acts under 10.137.4.1 as the gateway to the outside world if needed. I recommend to DISABLE the connection to the outside world via sys-firewall - you can easily do this by not assigning a NetVM to your Pentesting-FW via Dom0:
qvm-prefs -s Pentesting-FW netvm none
The only things which is still not working is the connection between the Kali VM and the vuln-server VM since Qubes-OS Firewalls do not allow VMs to talk to each other by default. This needs to be enabled in the Pentesting-FW VM via:
sudo iptables -I FORWARD 2 -s 10.137.4.19 -d 10.137.4.20 -j ACCEPT
sudo iptables -I FORWARD 2 -s 10.137.4.20 -d 10.137.4.19 -j ACCEPT
You will now be able to connect from your Kali VM to the vuln-server VM and the other way round. Keep in mind that this iptables rule does not survive a reboot of your VM - read more about how to fix this here. I can recommend the old article about playing with Qubes Networking from 2011 - most of the concepts are still valid in 2022.