After returning from the desert of South America, I received the same question from several people: “How do you plan and prepare yourself for such a trip?”. In this 2-post series I intend to provide some answers to this question (link to Part 2)
Introduction
- Part #1 Planning @ Home considers the planning and preparation tasks I executed before I went on the desert hike. I will primarily discuss the different tools that are available – mostly web based.
- Part #2 Navigation @ Tour focuses on some technical aspects in order to use the outcome of Part #1 during the trip.
As I pointed out already in previous articles, being outdoors has a lot in common with risk management. The more risks you are facing on your future trip, the more the proper planning and preparation becomes mission-critical. For hiking a weekend in the German low mountain range you obviously don’t need much planning since you will primarily face low level risks. This changes rapidly with the increase of risks / impact / probability: weather, remoteness, landscape, politics etc.
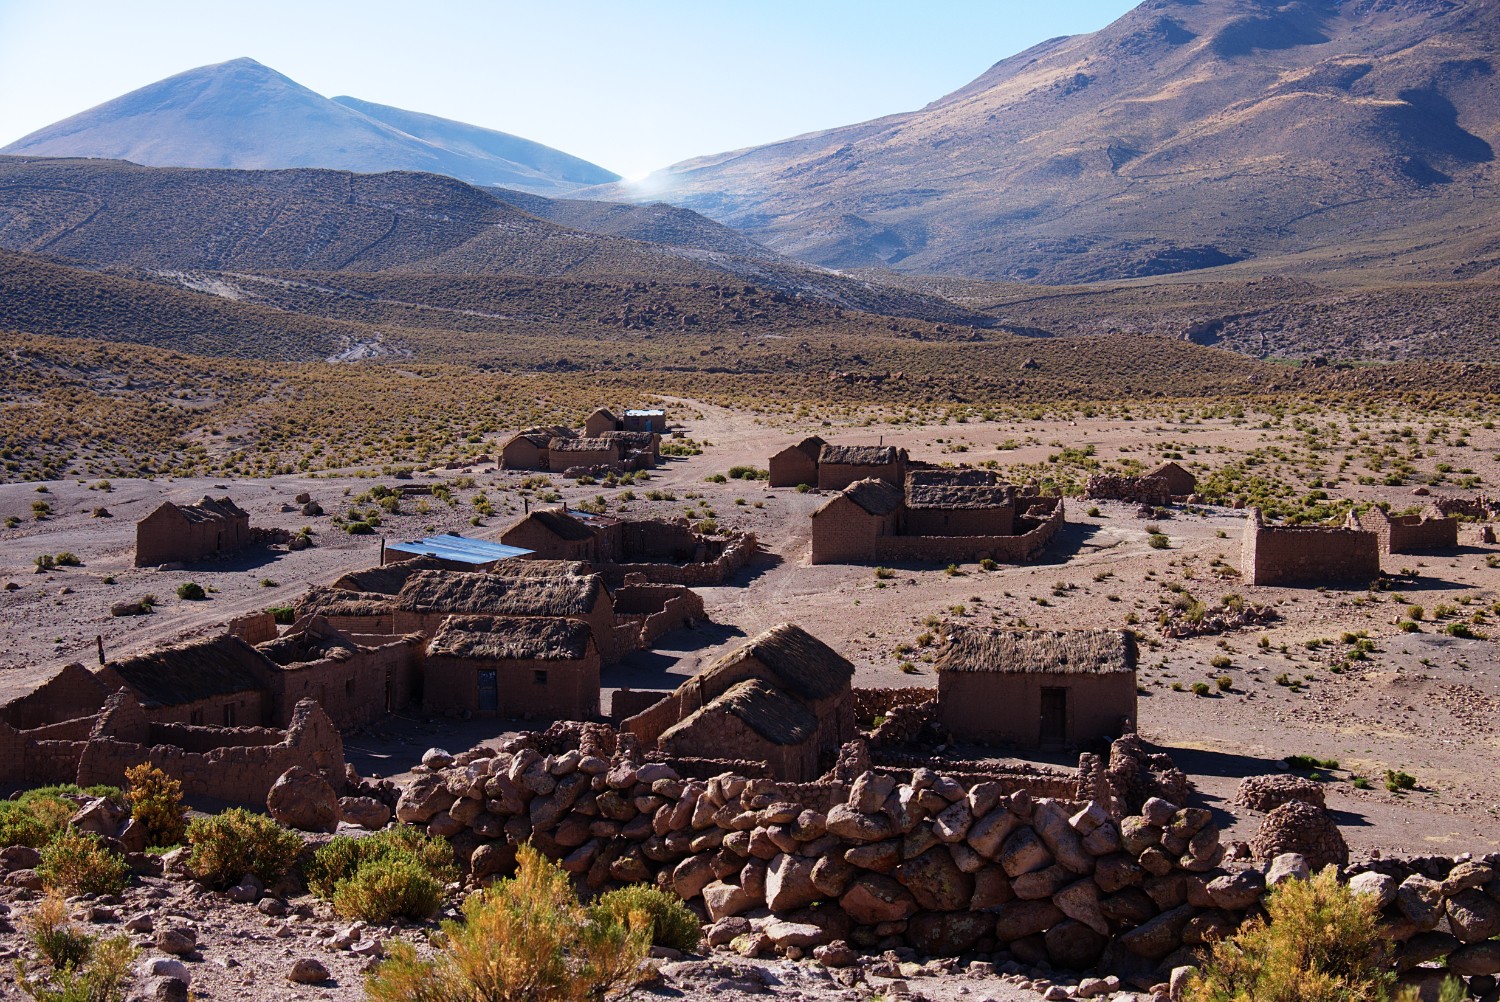
I will use my recent Altiplano trips (here and here) as an example and guide you through the different steps I executed in order to prepare for those desert hiking trips. I want to provide hands-on tips and recommendations and dive into the practical aspects of those.
Disclaimer: These are my thoughts - based on my skills and knowledge I brought along from previous trips. So use this information carefully - if you have questions, get in touch, I’m happy to help out if I can. Perhaps approaches and techniques below work for me but do not work for you. Furthermore, this is not a gear guide. I will focus on my equipment I used in the desert in another blog posting.
Preconditions
-
You need an idea! If you don’t have one, go out on the Internet, read books, talk to people and seek inspiration. Then come back. There are plenty of deserts out there - and there will be, unfortunately, even more in the future so this shouldn’t be an issue.
-
It is very probable that your plans will fail! You can invest months of planning, as I did for the Altiplano trip, and in the end things will most probably go differently anyway. Parts of this can be called “trail magic” - but other aspects also can have a heavy influence on how your plans will work out (e.g. your health, politics, weather, or even trivial topics like public transport schedules etc.) So with proper planning, you will, in the best case, approximate your intentions but never 100% reach them. Is this a drama? Probably not - but you should be aware of that.
-
Let your gut feeling drive you! If you didn’t catch fire for a specific idea you have, don’t do it. The planning and preparation stage has to fascinate you and keep you up at night, otherwise it isn’t worth the effort. If you are driven by external motivators (money, fame etc.), your motivation will not be sustainable. Furthermore, listen to your gut when it comes to parts during the planning stage that make you feel uncomfortable. Know your limits - if you intend to go to the desert, you will stretch them anyway. But everybody has a line that shouldn’t be crossed - the challenge is to find out where it is.
Other people would add additional stages at this point - check out Mikael’s (here) and Al’s (here) proposals.
Planning @ Home
The intention of this 1st part is to help with the challenge of finding / creating the right trail you intend to follow during your trip. Again, this post will not be about the gear you need to bring along. In case you follow one of the prepared and known hiking trails that already exist (e.g. US long distance trails - some containing desert parts), you will not find this section very helpful. We will deep dive into preparing our own trail and find suitable areas we can cross by foot.
Furthermore, it’s important to understand that we will make use of dirt roads & 4x4 tracks that already exist partially in the deserts of the high Andes. This means, we will not walk completely offroad - you can use the planning techniques below to do so, but this brings along other challenges (e.g. surface not made for walking trailer) which I will not discuss in this blog post series.
The techniques discussed below can easily be applied to the Altiplano / Puna region in South America - I haven’t tried it in Mongolia / China / Russia yet.
Fortunately, with the advent of the Internet, there are plenty of powerful tools that will help us in order to have a proper trail prepared before we hit the road. However, technical tools will never be able to beat experience - the more you have from the latter, the better. Free data could be wrong - what you see on your screen could be completely different when you are face the actual situation our there. So apply common sense and try to verify the data as best as you can. There are some way to do so which I will describe below as well.
Google Maps
Google Maps (GM) is the mother of the tool that I use for planning activities. The result of every other tool gets imported and consolidated in GM at a later stage. The reason is simply that GM let’s you overview the planned trail in an excellent and easy way considering the different base maps available. Additionally, you can easily import and export data as well as take it with you on your mobile device.
Baseline Features
In case you have no knowledge around the baseline features of GM, please get some before you continue. GM lets you easily store map information in your Google Drive so no data gets lost.
The most important feature I normally use is the creation of waypoints / GPS points in GM. These points can easily be created, imported, exported, saved etc. Additionally, new GPS points can be inserted from web sources via copy&paste in case they exist in the WGS84 Decimal Degrees Format (e.g. 31.4287,-59.1504) or WGS84 Degrees, Minutes, Seconds Format (e.g. 31°25′43.2″,-59°9′1.4″). You will potentially find online sources with interesting GPS information about the area you intend to go - then the copy&paste feature will be helpful.
Additionally, GPS points can be ordered into different layers which is extremely helpful in case your maps contain a lot of points.
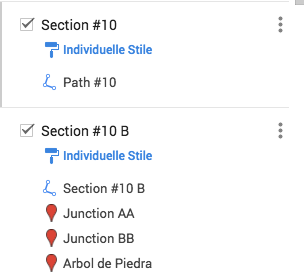
Unfortunately, the amount of layers is limited to 10 - so I had to create different maps for different sections due to the huge amount of layers and GPS points I used. They simply didn’t all fit into one GM document.
First, I divides the roughly 1000 km of desert trails in 4 different documents on GM. All 4 different documents then contained different layers covering the sub-sections of the trail including all GPS points. This gave me the flexibility to make use of all layers in the GM document but without losing the overview.
Additionally, I created an XLS sheet containing details, descriptions, dangers and other information for each section - see below:
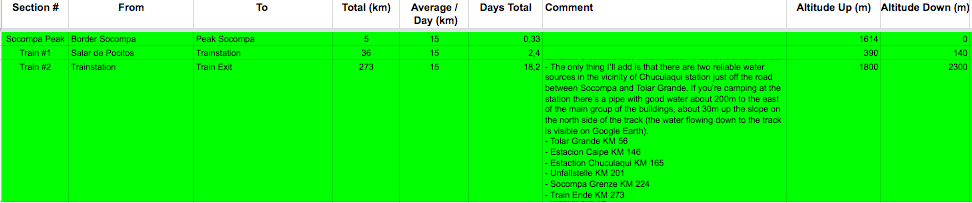
This brings along the great benefit that you have extended information material available on your smartphone for each section that you can review and improve with the help of local resources if available. Of course, this data can be stored in your Google Drive as well so you have all data at one location.

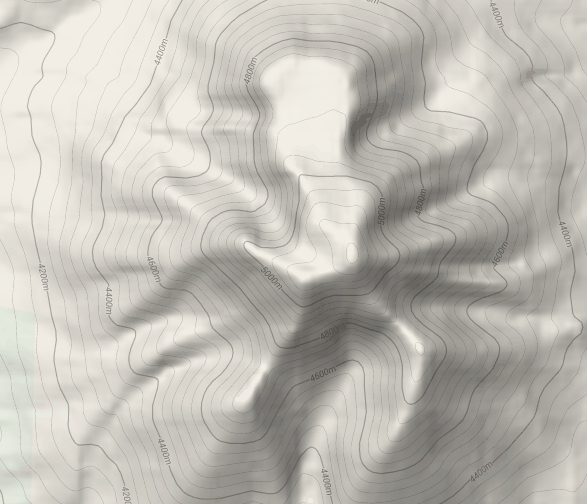
Satellite vs Terrain View
GM offers different terrain views - as a base map, I primarily use the “Satellite” as well as the “Terrain” view.
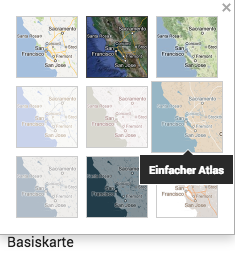
While the Satellite view is great for getting an impression of the landscape via satellite images, it sometimes is not very accurate due to clouds, snow coverage or outdated satellite images (see differences below in the images). What you can do in this case is switch to another tool - for instance, Bing Maps. There are some online tools mentioned below that offer different map views with just a few clicks.


The Terrain view is great for getting an impression about the slope situation.
Track Planning
While planning the track you intend to walk, you are basically connecting points of interest with each other. This means, first you need to have a rough idea which area you want to cross during your trip. This should be a high-level view - then you need to separate (divide) it into smaller sections and fill (conquer) them with the needed details.
For the Altiplano trip, I wanted to start in the Salar de Uyuni and then head south covering different places that looked exciting to me. So as an example, one section was from Salar de Uyuni to Laguna Colorada in the center of the Altiplano. Then I researched the situation in terms of trails - what was available, how was the altitude situation, where was I able to resupply with water, food etc. So I connected my waypoints, created different alternatives, calculated distances and reviewed resupply points. In the end, I reviewed the complete picture for this section before I started the same process for the next section. This can take weeks / months depending on the size of your trip.
So how does that work with finding the right trail in the desert? With GM you can easily measure the air distance between two GPS coordinates and it can also calculate the actual walking distance between GPS coordinates, if the road/track between the two points is known to GM as well. In case the road/track data is not available, you can only use the air distance - or you make use of other tools discussed below. So the baseline features from GM are helpful although not perfect.
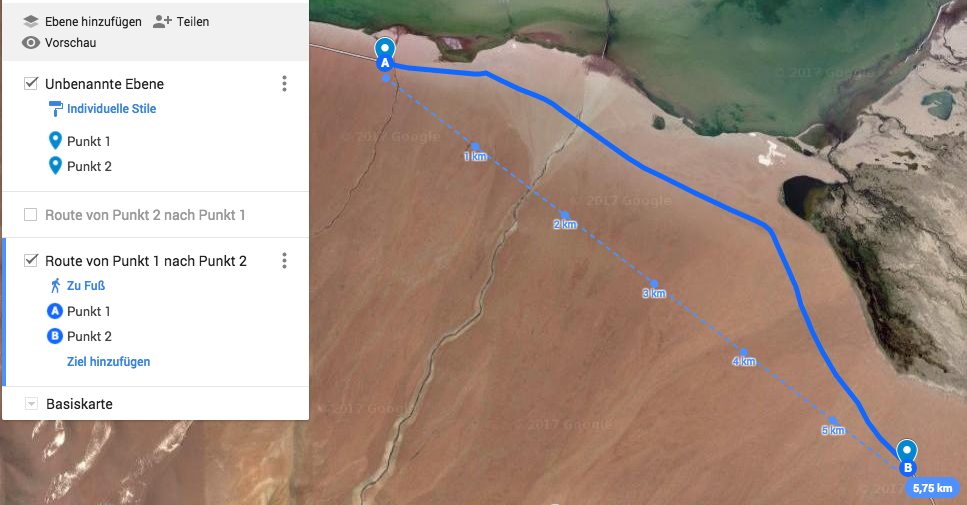
The image above shows a) the air distance and b) the actual track between two coordinates because GM understands that there must be a road, track etc.
The problem with this is that a lot of 4x4 vehicle trails / dirt roads I used on the Altiplano are not known to GM. This means, GM was not the right tool for planning purposes here. I assume this is the same for other more isolated areas where only few people with vehicles go and GM does not have a lot of track data. We will learn further down below how to create accurate tracks and then import them into GM. Important to understand is: The more you plan your trip via air distance only, the more deviation you will get which could heavily impact your planning.
Simplified Example:
- Day 1: Point A –> Point B:
- Measured Air Distance: 14 km
- Actual Walking Distance: 21 km
- Day 2: Point B –> Point C:
- Measured Air Distance: 18 km
- Actual Walking Distance: 23 km
Based on this example data, you will plan food/water supplies as well as time resources as follows: 2 days covering 32 km (14+18). However, reality looks different. Due to the lack of proper track data, you measured air distance data is wrong and you don’t have to cover 32 km but 44 km (21+23). This is a huge difference and the deviation will even get worse in case you plan 10, 20 or even 30 days of your trip like this. This can end up in pretty dangerous situations where you are running out of food/water/time.
1st rule: The more accurate your trail data (no air distance), the better you are able to plan supplies.
2nd rule: Always act conservative when it comes to planning - this counts for normal hiking trips but especially counts for desert hikes
Conclusion
GM is strong in providing good data of main roads, populated areas and satellite coverage - it’s weak when it comes to fine grained data for deserted areas, dirt roads, 4×4 tracks etc. For this, we will use other sources such as OpenStreetMap data or open GPS cycle/hiking communities described further down below.
I use GM as the “mothership” normally for my trips - in case I calculate and plan parts of the trip in other tools (see section “Other Online Resources” below), I will always come back to GM and import the GPS coordinates / trails there.
By doing so, I prevent to have the trip spread amongst different sources. Google Drive offers the capability to store additional information in an XLS sheet. The mobile App for Google Drive allows to store this kind of data offline - perfect for the time you are out in the desert without any Internet connection.
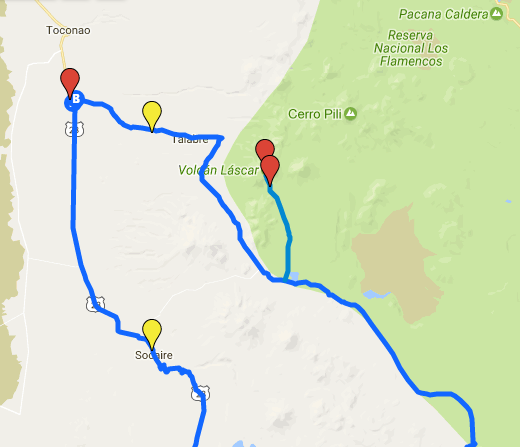
The example of a complete trail above shows trail parts imported from different resources: The main trail was done via GM itself since it knows the road around the town Socaire in the south. The trail up to Volcano Lascar is imported with the support of GPS data from another online webpage. Additionally, the GM trail is enhanced with potential water resources marked as yellow.
Main Lessons - TLDR:
- Always come back to GM and use it as the central trail management toolkit
- Use the data that GM offers - if you don’t find what you need, use other data sources and import it into GM
Google Earth
Google Earth (GE) provides some additional features that I like and which I briefly want to introduce below.

First of all, you can of course import your trail data into GE as well after you exported it from GM - or directly log into your Google account on GE.
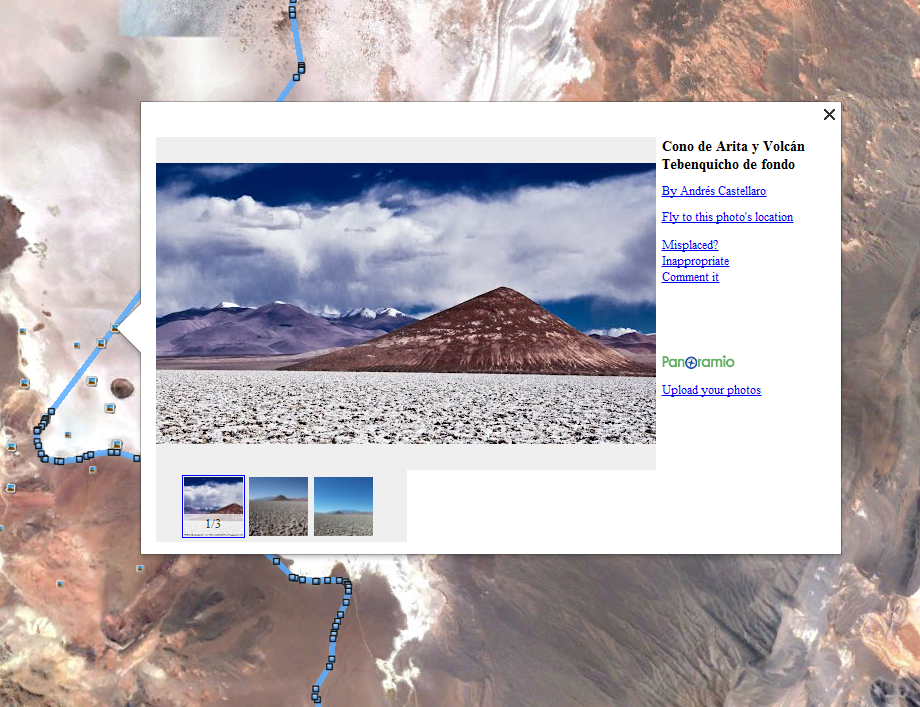
Next, additional pictures of the area listed in GE can help you to better understand the area. In my case for the Altiplano, for some areas pictures already existed and helped me a lot to understand the landscape of the area better (sandy? a lot of stones? houses? buildings?). But be careful: a lot of pictures on GE are wrongly located – most probably caused by wrong GPS metadata. So always try to verify the cases which you heavily rely on.
Example: I saw in one GE picture for my Altiplano trail a picture showing a water well - other reports I found and reviewed also mentioned water in this specific area. However, it turned out that the data was wrong - the picture was made somewhere else. It wasn’t a problem for me since I did not fully rely on this well in terms of water resupplying. But my experience with GE is that a lot of data is wrong there when it comes to pictures.

Another useful service is the altitude profile for the trail - other online services basically provide the same service, but I just want to mention it here that you can do the same with GE locally as well.
Finally, GE offers some “flight simulation” mode which could be interesting to get a better understanding of the landscape you are about to cross.
Some people even use GE instead of GM for their complete track and to consolidate all maps - I didn’t give it a try yet but perhaps this could be a great solution.
Luc Mehl, a person you should know when it comes to packrafting, made a great introduction video to GE - check it out here and here.
Main Lessons - TLDR:
- GE offers some good features to verify your track data and get additional information around it.
OpenStreet Map
OpenStreetMap (OSM) is basically free geographic data created by the community for the world.
As I stated in the GM part above, GM has its weaknesses in areas that are non-populated / where roads are basically 4x4 trails rarely driven but still existent. In these areas, don’t only rely on GM - OSM Data can be a good starting point to get additional trail information. Below I want to demonstrate the possibilities OSM offers based on a real-world example from my Altiplano Trip planning stage:
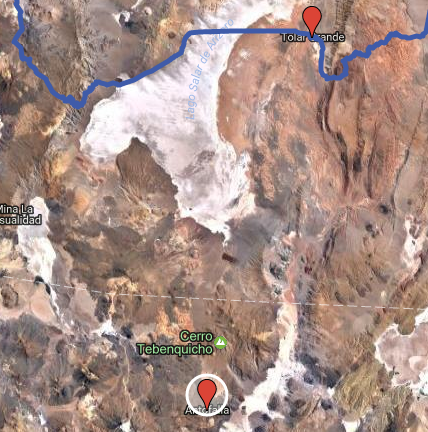
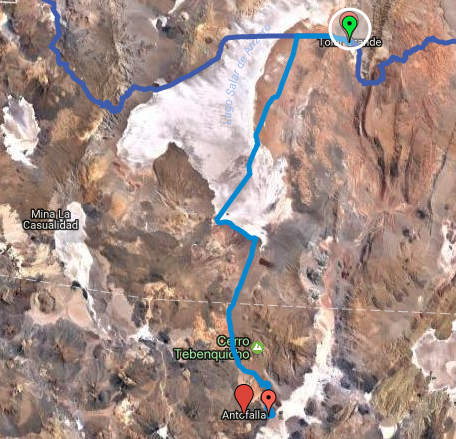
Step 1: The Problem We want to get a trail from Tolar Grande (Argentina) to Antofalla (Argentina) and ask GM to calculate one.
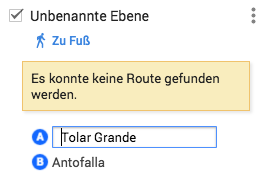
The problem is that GM is not offering any possibilities - it says that a route could not be found. This sounds legitimate since this is a deserted area with no main roads that got already screened by GM. GM is therefore not our main toolkit here.
Step 2: The Solution with OSM data
On brouter.de/brouter-web/ you can find a powerful web application that basically offers OSM data but makes it routable. This means, you can find a route from A to B based on OSM data. The traditional OSM website offers a similar service but I didn’t find an easy way to export the GPS data - hence we stay with brouter.de for now.
Let’s start with Tolar Grande and find a trail south to Antofalla. On the brouter web app you can zoom in and the more you zoom in, the more details the OSM data will offer you. By pressing “d” on your keyboard, you can start drawing and brouter will automatically calculate the shortest route to the next place you want to go.
The example above just shows the first steps of the drawing. In case the toolkit says “no route found” - go back and click the next waypoint closer to the last one you made. This makes it easier for the application to calculate the potential route. Now, let’s do this step by step until we reach Antofalla:
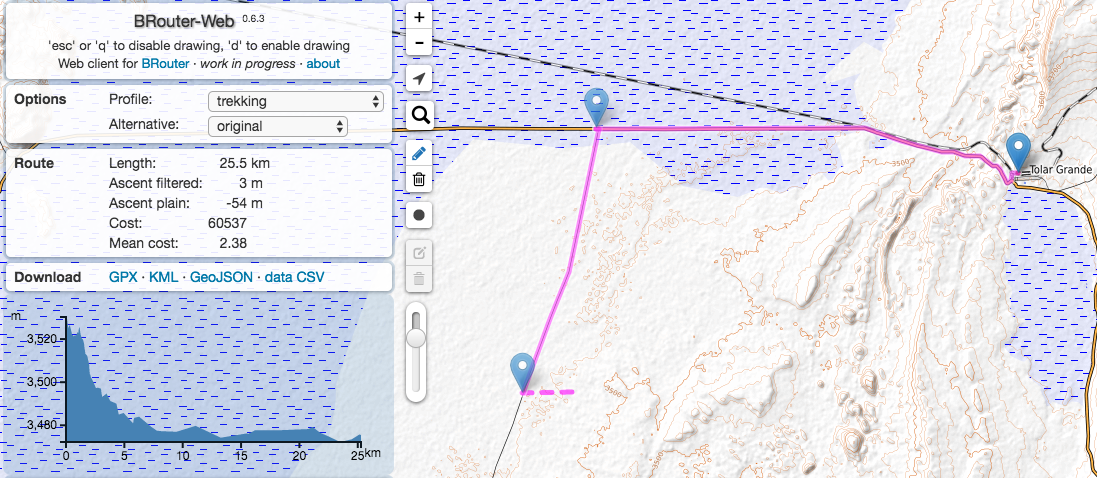
That’s it - a complete trail over roughly 150 km - including all GPS data, altitude profile and a possibility to export the data which we will make use of in Step 3. Did I mention already that this brouter app is amazing? Keep in mind: This is the total trail distance, not only air distance, since brouter calculates the complete trail distance through its routing algorithm.
Though, it brings along some issues from time to time that will force you to reload the app (Java Null Pointer Exception) - so I recommend to go step-by-step and divide the total trail into smaller parts you import into GM one by one. In case something breaks you don’t loose the complete trail.
Step 3: Consolidate and Verify Trail As I already mentioned, it’s crucial to consolidate the other sources into GM to make sure you have one tool with the core trail that you can use in the end.
While this is the main reason, there is also another one: Verification of the trail. We should not solely trust OSM - by importing it into GM, we can check the satellite footage on GM or even on GE and follow our new OSM-based trail to see whether you can really identify a trail / dirt road.
But let’s start first importing the data into GM:
- click on the brouter webpage on download GPX data which downloads a brouter.gpx file to your machine.
- Go into your GM Map and add a new layer in your GM map
- Import the GPX file
- See the amazing result
Now let’s verify the data and see whether the OSM data makes sense: Zoom into the full details on GM and review the satellite footage that GM offers for your complete trail.
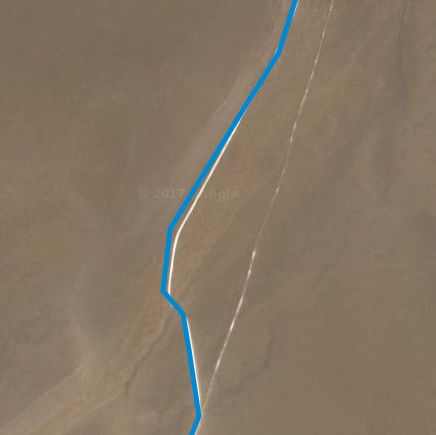
The result is: There is indeed a dirt road according to the GM satellite footage. You can now do this exercise for the complete trail or switch over to GE to do the same tasks there.
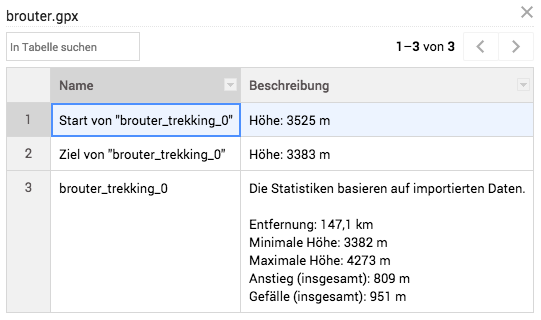
Important to mention is that even in GM you are able to access the metadata from this freshly imported trail. GM calculates its own metadata based on the import - the total trail distance is now 147,1 km while it was 148,9 km on brouter. You need to accept some sort of deviation obviously.
Conclusion:
OSM data provided via Brouter is powerful and very helpful for deserted areas like the Altiplano / Puna / Andes Area where you still have rarely used 4x4 dirt roads that obviously are listed in OSM. However, I doubt that this approach can be applied to all regions - you need to find out on your own. I used the same approach for a 10 days hiking/packrafting trip in Patagonia - however, we didn’t have any real 4x4 tracks there.
The combination of OSM and GM offers a powerful capability to consolidate GPS data into one core application.
Main Lessons – TLDR:
- Use OSM data in case you GM does not further help you
- Import data back into GM afterwards
Other Online Resources
In this section I want to introduce some other resources that I used partially in the past for the planning stage.
Offers some interesting services in case you intend to get some additional information around your complete trail that you have stored on GM. You can basically export it from GM and import it into the ridewithgps.com app - specifically the altitude diagram was essential to me during the Altiplano planning in case you don’t use GE for that. For instance, don’t underestimate the efforts you have to put into climbing from 4000m altitude to 4700m over a 10 km distance. This can easily take a complete day to cover.
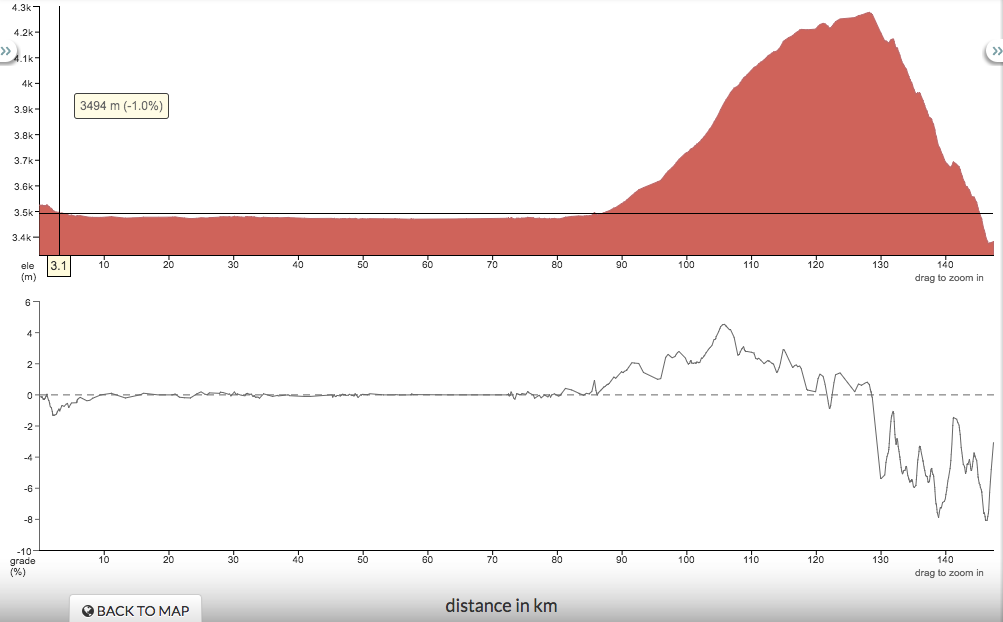
I also used the feature to identify the GPS position on the trail where I need to start to ascend. Taking the brouter.gpx data, ridewithgps.com tells me that roughly at the following GPS point, the climb up to 4300m altitude:
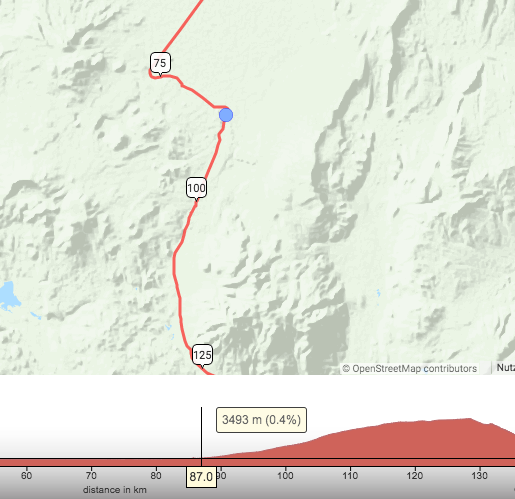
Why and when is this information useful? You need more energy in case you need to climb - therefore, you need to consider all climbs into your planning efforts and plan accordingly. This information is also important for planning night camps when you acclimate yourself to the height - also consider that the higher you get, the more freezing the nights could be.
deine-berge.de Offers capabilities similar toridewithgps.com - I used the Bing Map capability from time to time to see how a specific part of the map looks like on Bing maps.
alltrails.com I only use the convert feature on this website where you can convert different formats.
Final Thoughts
The combination of the different tools and services mentioned above helped me already to plan plenty of trips - once you get used to work with them, it gets easier and easier and you will continuously get better.
The final result of this Part 1 should be: You have a complete GPS trail marked in GM which you are ready to use. In Part 2 of this series, we will go through actually using the GPS trail we prepared in this stage. How are you able to do this while you are on the trail? Any interesting tools / devices? I will guide you through my setup step-by-step.